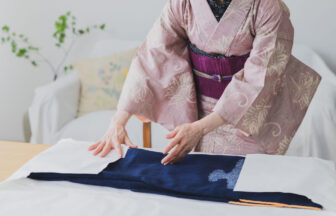
Anyone can do it by themselves! Basic yukata dressing – women’s version
femaleyukata (light cotton kimono worn in the summer or used as a bathrobe)dressing
Ideally, yukata should be worn cool and neat.That is why it is important to wear it on point so that it does not fall apart.Wearing a yukata is not difficult if you get the right points.Learn how to wear it beautifully by following the tips below.
What you will need when wearing a yukata
First, let’s get together what you need to wear a yukata.
1) Underwear for yukata…It is worn under the yukata so that bare skin is not visible. It is common to prepare two types of yukata, a hijyuban and a hemmoyoke, or a one-piece yukata that combines a hijyuban and a hemmoyoke.(2) Yukata…Make sure you have one that fits your size. obi…A cloth wrapped around the body to secure a yukata. Generally, a han-haba obi is used for women’s yukata.cord tied around the waist of a kimono before an obi is tied…A long, thin cord with a width of 4 or 5 cm. It is used to prevent a kimono from falling apart. Women need two cords.small four-stringed Japanese zither…A piece of cloth 10 to 15 cm wide. If not available, a koshi-himo (waist cord) can be used instead.After putting on the yukata underwear, put on the yukata body on your own body according to the following steps.
Basic yukata dressing – women’s version
1: After putting the sleeves on the yukata, hold both the left and right cuffs, raise both hands to shoulder height, and pull.Align the yukata with your shoulders.
2: Align both gussets and hold with the right hand, then hold the backstitch with the left hand and center them together.A beautiful kimono is always worn when the backstitch is always in the center of one’s back.
3: Pull out the crest of the garment (the back collar part) a little.Be careful not to pull it out too far, as it will give a sloppy impression.
4: Determine the length. Hold the top of the neckline about 10 cm above the tip of the neckline.
5: Lower the hem from the top and stop at the ankles.
If the yukata is placed high above the hips, it will not easily slip out of place.
6: Determine the front width. First, put your left hand around your right hip, aligning it at the point where the omomi line (the red line on the right side of the picture) comes to the little toe of your right foot.
7: While trying not to let the yukata slip out of place, open your left hand, and when your right hand goes around your left hip, raise the edge of the hem about 4 to 5 cm.
※By raising the hem at this point, it will be beautifully hemmed when completed.
8: Next, place your left hand around your right hip. While holding the hem so that it does not shift, remove the right hand and raise the edge of the upper front hem about 4 to 5 cm. As before, raising both ends of the hem here will create a beautiful hemmed shape.
9: Turn the koshi-himo from the front to the back and tie it. First, hold the center of the waist cord and tie it around your hip bone to prevent the yukata from slipping out of place.
*Tie the strings tightly here, as loose strings can cause the garment to slip down. Turn the string so that it falls forward from the lower stomach to the back, and pull it across the waist to tighten it properly.
10: Wrap the excess waistband around the waistband so that the end of the cord is not visible.
*One time at this point, make sure that the center of the back is not off-center.
11: From both sides, place your hands inside the yukata and move your hands from the center of the back side toward both sides, stretching out the wrinkles.
12: Take out both hands, this time, put the left hand under the armpit and fold the lower part of the body (the lower part of the right gown) into a triangle.
13: Reposition the lower body. While covering the left breast, reposition and hold the gable under the left breast.
14: Hold the upper garment (the left collar) with the right hand and adjust it so that the hollow of the throat (between the collarbones) can be seen. Be careful not to wear a loose gusset here, as this may cause the garment to fall apart.
15: Since it is loose, hold it under the chest and adjust it while covering the right breast, and tie it with the waist cord.At this time, make sure that the gills are out of place.To remove the girth, please pull the girth in the back.
16: Place your fingers inside the waistband and wring it from the center of the back toward the sides to remove wrinkles on the back. If the back side is loose, pull on the waistband.
17: Shape the front and both sides of the back by pulling the excess part of the kimono aside. At this point, make sure that the bottom line of the kimono is straight.
*If the line between the obi and the hachimono is straight and parallel, the kimono will look beautiful.
18: Tie the date-shime. After tying, place your fingers inside the date-shime as before to remove wrinkles, and pull out the kimono.
19: Remove any looseness in the upper body and wrinkles in the bodice, and shape the garment. Finally, check that the upper and lower seams (omimi-line) are aligned. The length of the o-hashori should be the length of your index finger when you tie the obi.
Tokyo Tarothree
store that has been gone out of business